Most WordPress website owners install Google Search Console, verify their site, and then never open it again. That is one of the biggest missed opportunities in SEO today. Google Search Console is not just a reporting tool for a WordPress website — it helps to communicate directly with Google. It gives you an exact performance report and tells you the website’s performance, which pages Google sees, which keywords are bringing visitors to your site, where your rankings are stuck, and what is stopping you from climbing higher. And the best part? It is completely free.
In this guide, I am going to walk you through how to use Google Search Console — not just set it up, but use it in a way that leads to real ranking improvements on your WordPress website. By the end of this post, you will have a clear action plan that you can start executing today, no SEO agency required.
Table of Contents
What is Google Search Console and Why Every WordPress Site Needs It?
A report downloaded from Google Search Console is like a report card for your website. While tools like Google Analytics tell you what happens when a user lands on your website. Search Console tells you what happens before — what someone searched for, whether your page appeared in results, and whether they clicked on it or not.
For a WordPress website, this data puts power in your hands since the platform offers full control over your content, structure, titles, and meta descriptions. When Search Console shows you a problem, you can fix it immediately right from your WordPress dashboard. No waiting for a developer, no raising a support ticket. The feedback loop between Search Console and your WordPress site is the fastest way to make SEO improvements at scale.
Here is why every WordPress site owner must use it without exception:
- You see your real keyword data: Not the keywords you hope to rank for, but the ones Google is actually showing your pages for
- You find pages that are almost ranking: Pages sitting at positions 8 to 20 are just one improvement away from Page 1
- You identify technical problems early: Crawl errors, indexing issues, and mobile usability problems show in the first tab.
- What’s going wrong with the website: Manual action penalties, security issues, and Core Web Vitals failures are all reported inside Search Console
- You track your progress over time: Every SEO change you make can be tracked with real before-and-after data
How to Set Up Google Search Console for Your WordPress Website?
Have you set up your website in Google Search Console? If not, here is how to set it up in under 10 minutes for your WordPress site.
Step 1: Go to Google Search Console and sign in with your Google account. Add your website domain after clicking on the “Add Property link”
Step 2: Choose Domain or URL Prefix Google gives you two verification options. Choose “Domain” if you want to track all versions of your website (www and non-www, HTTP and HTTPS). This is the recommended option for most WordPress sites.
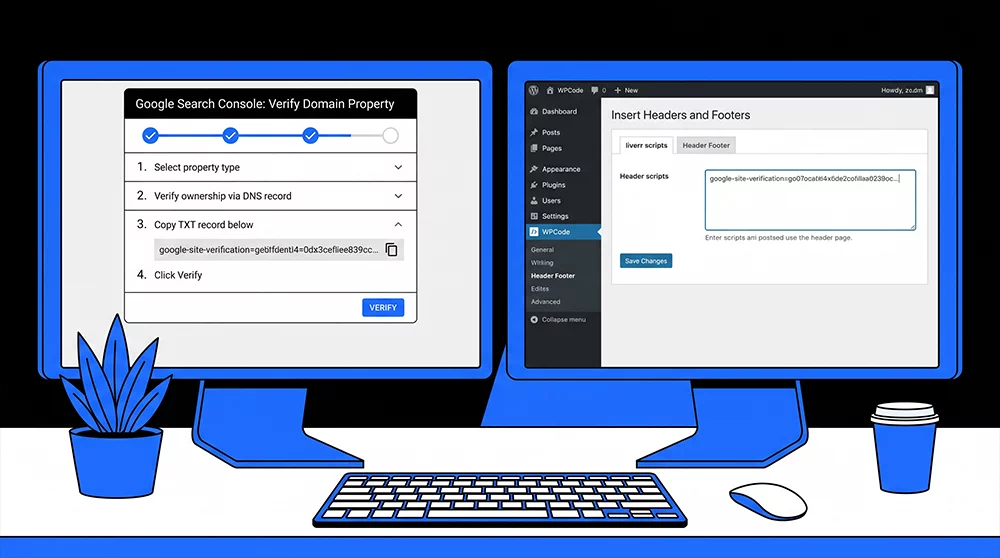
Step 3: Verify Your Website The easiest way to verify a WordPress site is through your DNS provider — Google will give you a TXT record to add to your domain settings. Alternatively, if you use an SEO plugin like Yoast SEO or Rank Math on your WordPress site, you can paste the HTML verification code directly into the plugin settings without touching your DNS at all.
Step 4: Submit Your Sitemap Once verified, go to the Sitemaps section in the left menu and submit your sitemap URL. For WordPress sites with Yoast SEO, your sitemap is usually at yourdomain.com/sitemap_index.xml. With Rank Math, it is yourdomain.com/sitemap.xml. Submitting your sitemap tells Google exactly which pages to crawl and index on your website.
Step 5: Wait 24 to 48 Hours Search Console takes a day or two to start populating data. Once it does, you will begin to see impressions, clicks, and keyword data rolling in.
How to Analyze Google Search Console Data to Find Your Best Opportunities?
This is where most people stop — they open Search Console, see a bunch of numbers, and close the tab. Let me show you how to actually read and analyze Google Search Console data to turn it into SEO wins.
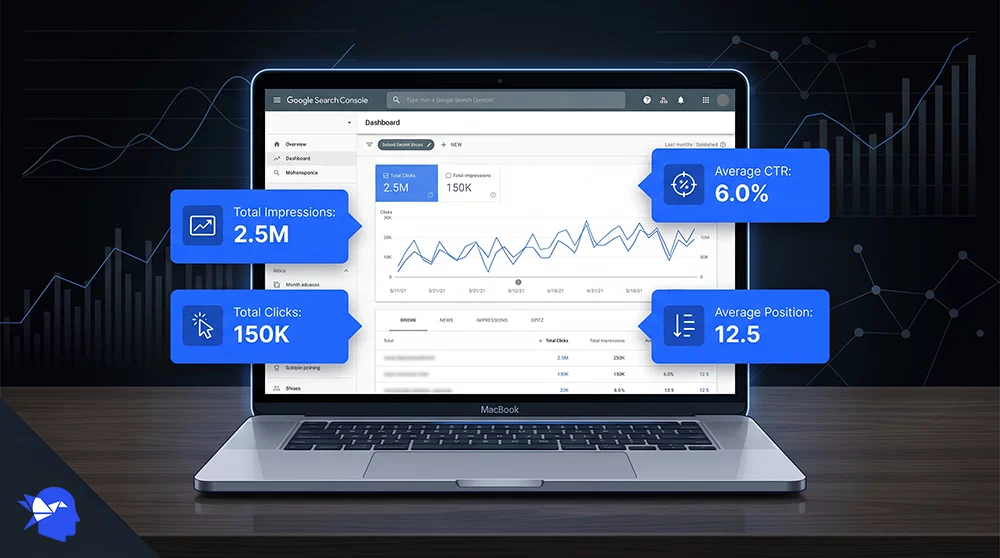
Navigate to the Performance Section Click “Search Results” under the Performance menu. You will see a graph and four key metrics at the top:
- Total Clicks — how many times people clicked your pages from Google search
- Total Impressions — how many times your pages appeared in search results
- Average CTR — the percentage of impressions that turned into clicks
- Average Position — where your pages rank on average
Make sure all four boxes are checked so you can see all metrics together.
Set Your Date Range to 28 Days Always analyze 28 days of data for a fair view. This filters out weekly fluctuations and gives you a reliable monthly snapshot. This is also the same data I recommend you export and feed into AI tools — as explained in the AI SEO hacks guide, where I covered how AI can analyze this data and build you a full ranking master plan in minutes.
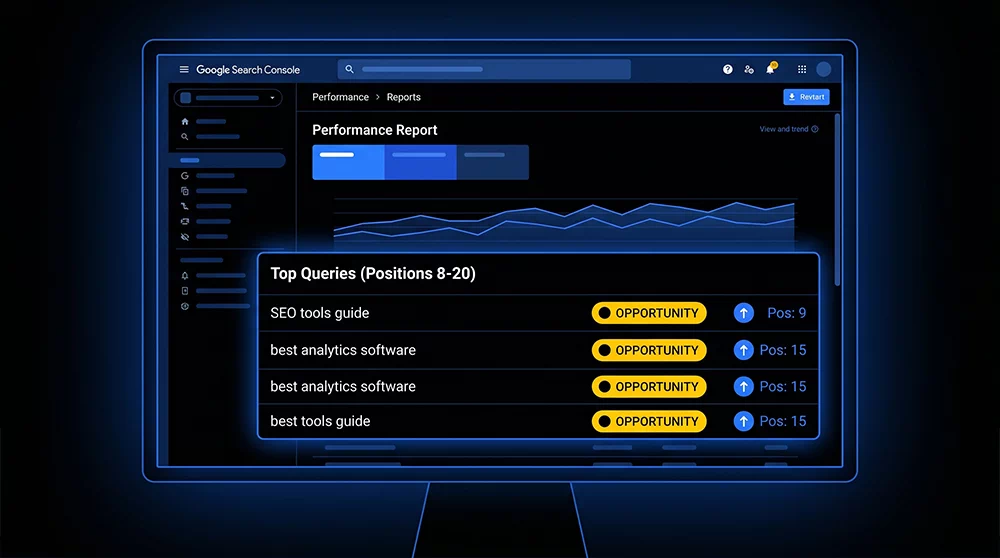
Sort by Impressions — Find Your Hidden Opportunities Click the “Queries” tab and sort by Impressions from highest to lowest. Now look at the Average Position column next to each keyword. You are looking for keywords that have:
- High impressions (1,000+) — meaning many people are searching for it
- Low CTR (under 3%) — meaning your page is showing up but people are not clicking
- Position between 8 and 20 — meaning you are on Page 1 or close to it
These are your golden quick-win keywords. A small improvement to your meta title, meta description, or page content can push these from position 12 to position 4, and your traffic will multiply overnight.
Here is a real example of how this works:
Imagine your website has a blog post about “WordPress speed optimization.” Search Console dashboard displays it at position 14 with 3,200 impressions but only a 1.2% CTR. That data means 3,200 people saw your page in the last 28 days, only 38 of them clicked. If you decide to fix your meta title to be more compelling, improve the meta description with a clear benefit, and update the content to match search intent better, you could move that page to position 6 — and your clicks could jump from 38 to over 200 in the same month. That is five times more traffic from the exact same page with no new link building.
How to Fix Meta Titles and Descriptions Directly From Search Console Findings?
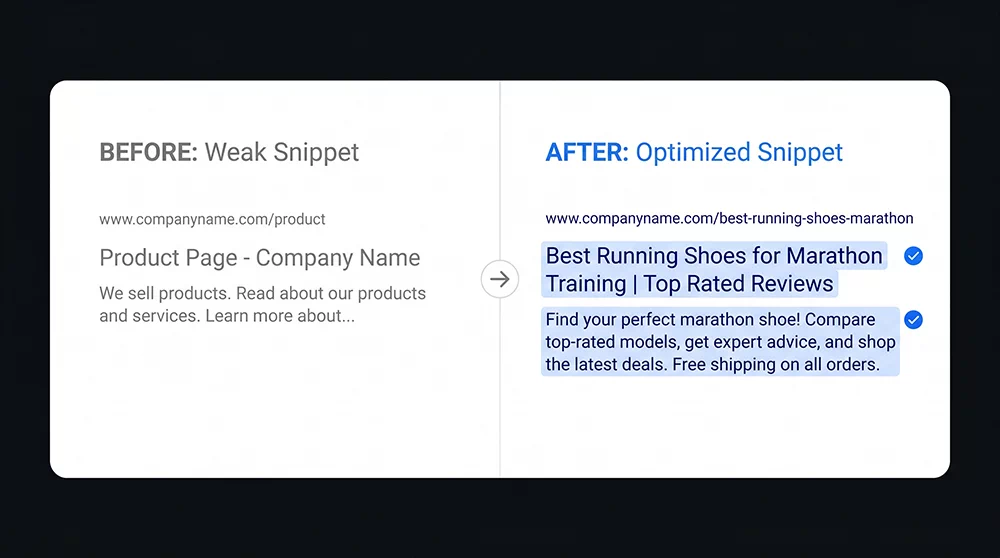
Once you have identified pages with high impressions and low CTR take the first step to fix the meta title and meta description. These are two things a user sees on the Google results page before deciding whether to click. If the user does not click, it does not matter how good your content is.
Here is how to write better meta titles and descriptions based on your Search Console data:
For Meta Titles:
- Keep them between 50 and 60 characters so Google does not cut them off
- Start with the primary keyword or include it within the first few words
- Use power words when writing a meta title that triggers curiosity or urgency — add words like “Fast,” “Free,” “Without,” “Mistakes,” “Step-by-Step”
- Appeal to the user with a promise — “Rank Your WordPress Site in 30 Days” is better than “SEO Tips for WordPress“
For Meta Descriptions:
- Keep them under 155 characters
- Place your primary and secondary keyword naturally
- Always end with a clear call to action — “Learn how,” “Read the guide,” “Start today”
- Address the search intent — if someone searches “how to fix WordPress speed,” your description should promise exactly that solution
How to update these in WordPress: If you are using Yoast SEO, open the blog post or page, scroll down to the Yoast SEO section, and click the “Edit Snippet” button. You will see fields for the SEO title and meta description. Make your changes and update the page. Google will recrawl the page within a few days and your new snippet will start appearing in search results.
Using Google Search Console to Fix Indexing and Technical SEO Problems on WordPress?
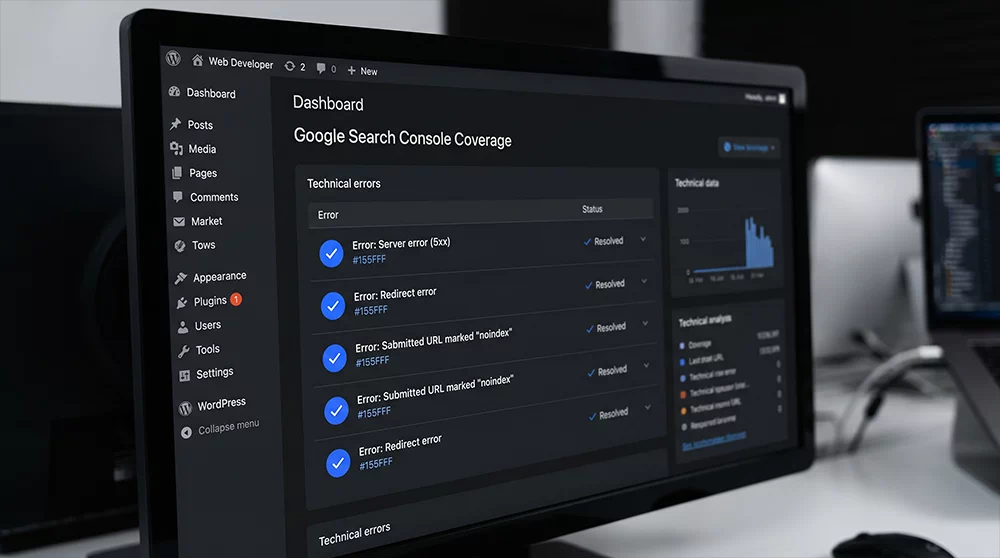
Beyond keyword and CTR data, Google Search Console is your best tool for catching technical SEO problems that can silently destroy your rankings. The Coverage report and Core Web Vitals report inside Search Console are two sections you should check every single month.
The Coverage Report — Check What Google Can and Cannot Index:
Go to Index > Pages in the left sidebar. You will see a breakdown of all your pages divided into:
- Indexed — pages Google has successfully crawled and included in search results
- Not Indexed — pages Google found but chose not to index (these need investigation)
Common reasons for pages not being indexed on WordPress sites:
- The page was set to “noindex” accidentally by an SEO plugin
- The page has duplicate content and Google chose a different version
- The page is blocked by your robots.txt file
- The page has thin content and Google does not consider it useful enough to show
Each reason requires a different fix, and Search Console tells you exactly which category each page falls under — making it easy to prioritize what to fix first.
Core Web Vitals — The Speed and Experience Report:
Google’s Core Web Vitals measure how fast and user-friendly your website is. A slow WordPress website will lose rankings even if its content is excellent. The three main metrics are:
- LCP (Largest Contentful Paint) — how fast the main content loads. Should be under 2.5 seconds
- INP (Interaction to Next Paint) — how quickly your site responds when a user clicks something. Should be under 200ms
- CLS (Cumulative Layout Shift) — how stable your layout is while loading. Should be under 0.1
If you WordPress site dismisses such metrics, then Search Console will label it as a “Poor” or “Needs Improvement” URL. This is a direct signal that Google is holding back your rankings because of site experience. This is exactly where professional WordPress page speed optimization becomes critical — not just for rankings, but for keeping visitors on your site once they arrive.
Download Your 28-Day Data and Use AI to Build Your SEO Master Plan
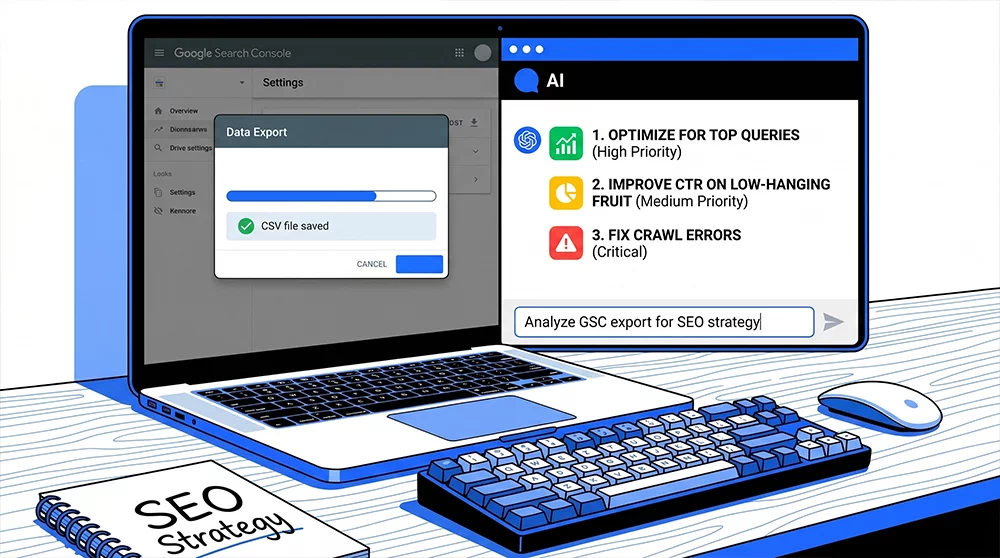
Now that you know how to read and interpret your Search Console data, here is the most powerful move you can make — export it and let AI analyze it for you. This single combination of Google Search Console data plus AI analysis is what separates website owners who rank consistently from those who stay stuck at page 3.
How to export your Search Console data:
- Go to the Performance section and set your date to the last 28 days
- Click the download icon (↓) in the top right corner of the performance chart
- Select “Download CSV” — this gives you a full spreadsheet of all your keyword data including queries, pages, impressions, clicks, CTR, and average position
What to do with it:
Take that CSV file and upload it to an AI tool like ChatGPT or Google Gemini. Then give it this instruction:
“Here is my Google Search Console data for the last 28 days. Please analyze it and: find my quick-win keywords between position 8 and 20, identify pages with high impressions but low CTR, flag any patterns in my meta titles that might be hurting click rates, and give me a prioritized 30-day action plan.”
The AI will return a detailed, personalized SEO plan built entirely from your own real data. For a deeper look at exactly how to train AI and use these results, the complete AI SEO hacks guide walks you through every step of that process with detailed instructions you can follow right away.
How Often Should You Check Google Search Console for Your WordPress Site?
Knowing what to check is only half the battle — knowing how often to check is equally important. Here is the review schedule I recommend for every WordPress website owner:
Weekly (10 minutes):
- Check for any new manual actions or security issues in the Overview section
- Look at whether your clicks and impressions are trending up or down this week compared to last week
- Check if any pages have suddenly dropped in position
Monthly (45 to 60 minutes):
- Download your full 28-day CSV export and analyze it with AI
- Review the Coverage report for any new indexing errors
- Check Core Web Vitals for any new “Poor” URLs
- Identify your top 5 quick-win keywords and update the relevant pages
- Resubmit any fixed pages for recrawling in the URL Inspection tool
Every 3 Months (Full Audit):
- Compare your current 28-day data with your data from 3 months ago
- Track which keywords have moved up and which have dropped
- Review your top 10 landing pages and refresh their content
- Identify new keyword opportunities that have appeared in your data
- Plan a new content cluster based on trending search queries in your niche
This rhythm keeps your WordPress website moving forward consistently and ensures you always catch problems before they become serious ranking drops.
Final Thoughts: Search Console is Your Most Powerful Free SEO Tool
There is no excuse for not using Google Search Console for your WordPress website. It costs nothing, requires no technical expertise to start, and gives you direct data straight from Google about how your website is performing. Every piece of information you need to improve your rankings is already waiting inside that dashboard — you just need to know where to look and what to do with it.
Start with one action plan today. Log into your Search Console go to the Performance report, sort by Impressions, and find three keywords where your position is between 8 and 20. Fix those three pages — update the meta titles, meta descriptions, and refresh the content. Then wait two weeks and watch what happens. That small action, done consistently every month, will compound into significant ranking gains over time.
If you want to take it a step further and let AI analyze you automatically, make sure you read the complete AI SEO hacks guide — it covers exactly how to feed this data into AI and get a full ranking master plan without spending a single dollar on an agency.
Frequently Asked Questions
Is Google Search Console paid?
Not at all — and honestly that is the most surprising thing about it. Google Search Console is completely free. Always has been. It is not complicated like making a website; you just need a Google account to get started. There is no premium version, no trial period that expires, and no hidden features locked behind a paywall. For a tool that gives you direct data from Google about how your website is performing in search results, free feels almost too good to be true — but it genuinely is free for every website owner.
How do I use Google Search Console?
Start simple. Once you verify your website and the data starts coming in, the one report worth opening first is the Performance report under Search Results. You will see the full report in the performance dashboard, which keyword your site is appearing for, how many times people saw it, how many clicked, and where you are ranking. Sort the keywords by impressions — highest to lowest — and look for pages that are getting a lot of views but very few clicks. Those are your fastest wins. Apply recommended keywords in the meta title, improve the description, request indexing, and check back in two weeks. Repeat that single habit every month; it is more valuable than most paid SEO tools.
Can I see how much traffic a website gets?
In Google Search Console, you can see your own website’s traffic in detail — clicks, impressions, average position, and click-through rate. But here is the important part — you can only see data for websites you own and have verified. In Search Console, you can’t find out the website traffic of others. You have to get a subscription to a third-party tool like Semrush or Ahrefs to check estimated competitor traffic, which estimate traffic based on ranking positions and keyword search volumes. Those are approximations though — the only place you get real traffic numbers is inside your own Search Console account.
Is Google Search Console good for SEO?
Search Console provides you with accurate data directly from Google. It allows you to discover the keywords your pages are really ranking for, identify pages that rank between positions 8 and 20 and therefore could just need a little nudge, recognize meta titles that are getting impressions without clicks, and discover technical issues before they harm your rankings unnoticed. An SEO strategy without reliably monitoring Search Console data is, in fact, a shot in the dark.
Which Google tool is used for SEO?
Google actually offers a bunch of free tools that combined, almost fully satisfy your SEO requirements. Most crucial is probably the Google Search Console which allows you to track keyword positions, website pages getting indexed and the overall health of the site. Google Analytics will tell you the actions taken by visitors on your website after arriving there. Google PageSpeed Insights allows you to measure how fast your website pages load and also provides you with your Core Web Vitals scores. Google Trends informs you about the keywords that are increasing or decreasing in popularity over time. And Google’s Rich Results Test validates whether your schema markup is correctly implemented. This set of free tools for most website owners is enough to fulfill about 80% of what paid SEO software platforms, which charge hundreds of dollars per month, can do.
How long does it take for Google to remove dead links?
The honest answer? There is no magic timeline. Google usually drops by to recrawl pages anywhere from a few days to a few weeks, mostly depending on how active your site is and how much authority it has.
When Google finally revisits a link and hits a 404 error, it will remove it from the index—but ‘eventually’ can mean a few weeks or even several months of just waiting around. If you want a dead link wiped out fast, don’t wait for Google’s natural crawl cycle. Save yourself the headache and use the URL Removal tool inside Google Search Console. It’s the absolute fastest way to tell Google, ‘Hey, stop showing this link in search results right now.
How do I stop a page from being indexed?
Adding a ‘noindex’ tag is the most reliable and easiest way to stop page indexing. You can easily place noindex if your website is running on WordPress. Go to the plugin SEO settings of the page editing section click advanced section check noindex option. Once you complete this step save the page and Google will stop indexing it after the next crawl. If the page is already in Google’s index and you don’t want to wait for deindexing, combine the noindex tag with a request through the URL Removal tool in Google Search Console. One important thing to note — do not block the page in robots.txt if you want Google to respect the noindex tag. Google needs to be able to crawl the page to see the noindex instruction. Blocking it in robots.txt prevents Google from reading the tag at all.
How do I submit my site to Google Search Console?
It is simpler than most people expect. Go to search.google.com/search-console and sign in with your Google account. Click Add Property and enter your website domain. Google will ask you to verify that you own the site — the easiest method for WordPress users is through your SEO plugin. In Rank Math, go to General Settings and paste the Google verification code into the designated field. In Yoast SEO, you will find the same option under Webmaster Tools in the plugin settings. Once verified, go to the Sitemaps section in Search Console and submit your sitemap URL — for most WordPress sites using Rank Math this is yourwebsite.com/sitemap_index.xml. After that, Google will start crawling your site and data will begin appearing in your dashboard within 24 to 48 hours.